
By Shaun Chittick.
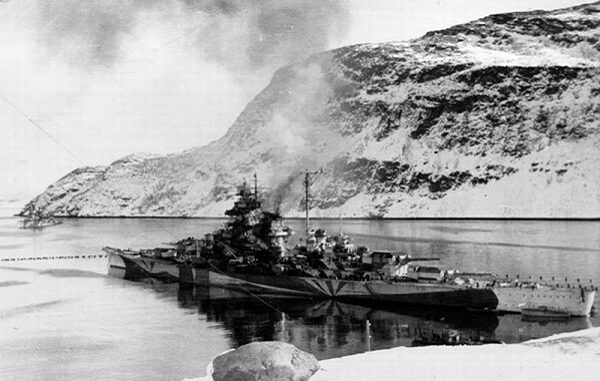
Image: The German battleship Tirpitz at anchor in the Kaafjord, Norway during World War II. (source Bundesarchiv)
Background
This essay provides an account of the British submersible attack against the German dreadnought Tirpitz in the fjords of Norway in September 1943. The Tirpitz’ sister ship, Bismarck, was destroyed and sunk at great cost to England, but Tirpitz remained the primary surface threat to Allied shipping across the North Atlantic that provided a vital lifeline to England and the European Theater during World War II. The Kriegsmarine (German Navy) moved Tirpitz to a protected anchorage in the Kaafjord, well out of range of allied reconnaissance aircraft and bombers.
British Prime Minister Winston Churchill wrote, “The greatest single act to restore the balance of naval power would be the destruction or even crippling of the Tirpitz.” He added, “No other target is comparable to it. It seems very discreditable that the Italians should show themselves so much better at attacking ships in harbor than we do.”
Tirpitz was one of the world’s most powerful battleships at the time, and her menacing presence adjacent to the North Sea forced England to limit a significant number of her capital ships in defense of home waters, as well as protecting convoys bringing vital supplies from the United States.
Tirpitz’s only other safehaven was the drydock at St. Nazaire, which was put out of commission during a successful but costly raid by British commandos eighteen months prior.
British frogmen executed Operation TITLE in October 1942, which was to be a human chariot attack on Tirpitz in Trondheim, Norway using Chariot MK I two-man torpedoes.
Royal Navy engineers had been working on the prototype for a 51-foot, 30-ton, four-man midget submarine specifically designed to attack naval targets in strongly defended anchorages. They had developed, in effect, a complete submarine in miniature, but in lieu of torpedoes, the submersibles were fitted with two detachable saddle explosive charges fitted externally on either side of the pressure hull. Each charge consisted of two tons of Amatex explosive, to be placed on the seafloor beneath a target ship and then initiated with a variable time fuse.
Mission Tasking
British “X-craft” submersibles would be towed 1200 miles into the operational area to attack German battleships Tirpitz and Scharnhorst, as well as the heavy cruiser Lützow. Each of six RN submarines from the 12 Submarine Flotilla would tow an X-craft between 20 and 22 September 1943.
Submersibles X-5, X-6, and X-7 were tasked with attacking Tirpitz. X-8 would simultaneously attack the Lützow; and X-9 and X-10 would attack the Scharnhorst.
Operational Prep of the Environment
On 12 September 1943, a Russian pilot located Tirpitz at her anchorage in Altenfjord. Despite overcast and a rainstorm, the pilot descended under the edge of the clouds and made three passes at 50 meters while under heavy anti-aircraft fire. He was able to capture quality imagery of the dreaded battleship, which was later transferred to the British Admiralty. British planners began mission planning for a bold, unprecedented operation.
Altenfjord was one of the largest Kriegsmarine bases outside of Germany. German forces there threatened Allied convoys carrying critical supplies to Russia and would provide a powerful defense against any attempted British invasion of Norway.
Kaafjord lay deep at the base of the Altenfjord, sheltered between two mountain ranges, and out of range of British reconnaissance aircraft and bombers. Tirpitz was protected on the surface of the fjord by two rings of anti-torpedo nets. The nets were only opened for German ship and boat traffic. German gun boats constantly patrolled the fjord. The entrance to the fjord was protected with an anti-submarine boom and German Patrol Boats equipped with hydrophones.
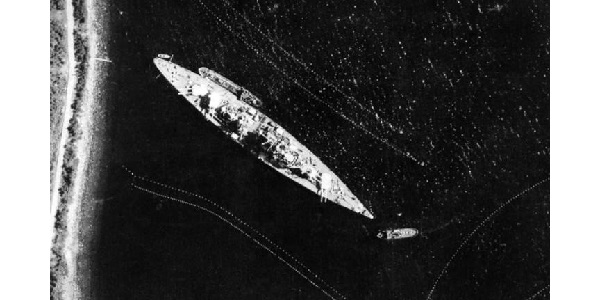
Photo: Tirpitz at Kaafjord, Norway, protected by anti-torpedo nets. (Imperial War Museum photo)
Mission Planning and Training
British Royal Navy (RN) Commander Cromwell Varley developed the attack plan, supported by Commander of Submarines, Admiral Max Horton. Incidentally, CDR Varley designed and built the first X-craft for the Royal Navy.
The overarching plan was for six RN conventional submarines to tow X-craft 1,200 miles northeast from Scotland across the Norwegian Sea. At a predetermined point west of Soroy Sound, the transit crews would recover aboard their tow submarines, and the X-craft operational crews would board their respective submersibles, slip tow from their tow submarines, and proceed alone toward the objective area. Their route would take them through a reported minefield. The X-craft would proceed undetected through Stjern Sound, then along Altenfjord roughly 60 miles to Kaafjord, penetrate the anti-submarine boom, cut through the two layers of anti-torpedo nets surrounding their targets, emplace their charges no earlier than 0100 on 22 September, to give all X-craft enough time to penetrate the fjord and approach their respective targets. The X-craft would then return through the nets, the same anti-submarine boom, back through the minefield and a welcome rendezvous with their tow submarines.
A period of intense training began in Scotland in June 1942 with a select group of volunteers for “hazardous and arduous service”.
Order of Battle
- RN diesel electric submarines
HMS Thrasher
HMS Truculent
HMS Stubborn
HMS Sea Nymph
HMS Syrtis
HMS Scepter
- Submersibles (“X-craft”) and Officers-in-Charge (OICs)
X-5 -LT Henty-Creer, RNVR
X-6 -LT Donald Cameron, RN
X-7 -LCDR Geoffrey Place, RN
X-8 -LT McFarlane, RN
X-9 -LT Martin, RN
X-10 -LT Hudspeth, RANVR
- X-craft Crews
40 x RN officers and men
1 x RNVR (Royal Navy Volunteer Reserve) officer
1 x RANVR (Royal Australian Navy Volunteer Reserve) officer
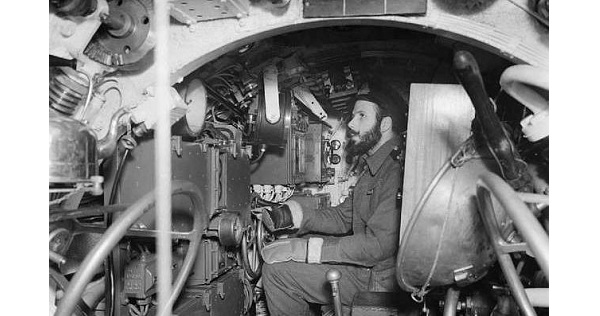
The commanding officer of an unidentified X-craft at the hydroplane controls during training. The commander is Sub-Lieutenant Robinson, RNVR. (SOURCE: Imperial War Museum 26933)
X-Craft Technical Specifications
A detailed cutaway schematic of the British X-craft submersible can be viewed at the link below:
https://svppbellum.blogspot.com/2024/03/royal-navy-ww2-gli-x-craft-erano.html
- Length: 51.25 feet
- Beam: 5.75 feet
- Draught (height): 5.3 feet
- Displacement (weight): 35 tons
- Depth Limit: 300 feet
- Speed: up to 6 knots surfaced, and 5.5 knots submerged
- Range: 500 miles (surfaced), 82 miles (submerged)
- Endurance: 14 days
- Four crewmen (Captain, First Lieutenant, Engineer and a Diver)
- Propulsion: 4-cylinder, 42 hp Gardner 4LK diesel engine and Keith Blackmann 30-hp electric motor
- Auxiliary equipment: periscope and sonar
- 2 x external 2200 lb. Amatol detachable charges housed in two detachable shells
The X-craft submersible program developed from a Military Intelligence (MI) project initiated in early 1940, one of the predecessor units of the Special Operations Executive (SOE). The initial concept was to use submersibles to attack bridges over the Rhine.
Germany’s blitzkrieg captured territory too swiftly, so MI handed the project over to the Admiralty, under Max Horton who was Vice Admiral (Submarines).
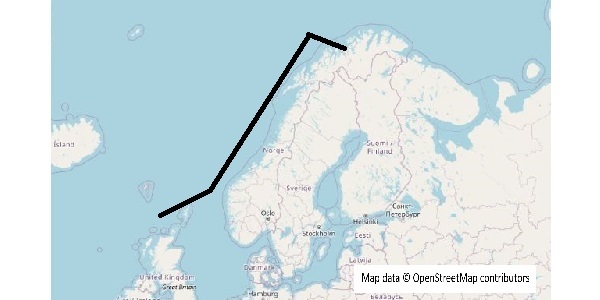
Operation SOURCE Task Group Transit from Lock Cairnbawn to Altafjord. (Image by SOF News using OpenStreetMap)
The Transit
The Operation SOURCE task force departed from Loch Cairnbawn at intervals on both 11 and 12 September 1943. Six conventional submarines, each with an X-craft in tow, left HMS Ballentyne in Scotland for Altenfjord. Each X-craft was manned with a transit crew for the weather was rough at the outset, but the wind gradually died, and the night was calm, hazy, and moonlit. They spotted a German U-boat on the 2nd day and attacked it with depth charges. The decision was made to continue mission.
The transit was uneventful for the first 4 days, traveling at an average speed of 8 to 10 knots. The X-craft were towed submerged to prevent detection and surfaced every 6 hours for 15 minutes to ventilate the craft.
At 1550 on 15 September, the manila tow rope between X-7 and Stubborn parted but they managed to stay in contact and an auxiliary tow was passed. Stubborn successfully re-established the tow at 1700.
X-8’s manila tow rope parted from Sea Nymph at 0405 on the 15th. Sea Nymph’s crew was unaware of her lost payload until she surfaced at 0600. The submarine immediately backtracked along her transit route in search of the missing X-craft. At 1630, X-8 spotted and rendezvoused with HMS Stubborn, and followed along behind her and X-7 for seven and a half hours until contact was lost. At 0315 on the 16th, Stubborn spotted Sea Nymph and updated her regarding X-8. Sea Nymph conducted a frantic search and located X-8 at 2005 that night, rigged once again for tow and continued on toward the target area.
X-9 was lost when her manila tow rope parted. This wasn’t noticed by the crew of the Syrtis until she surfaced at 0910. Retracing her course, Syrtis found only an oil slick along their previous track. X-9’s transit crew, consisting of Sub-LT Kearon, A.B. Harte and Stoker Hollet, were all lost with the stricken craft.
On 17 September, while being towed behind HMS Sea Nymph, X-8 began experiencing serious buoyancy and trim issues. The crew determined that water was leaking into its detached, side-mounted explosive charges. The commander ordered his crew to jettison the flooded starboard charge. At least part of the charge detonated roughly 1,000 yards behind the X-craft without causing any noticeable damage. Later, the port side charge also began to flood and was jettisoned. The second charge exploded around three miles astern, but the shock wave severely damaged X-8‘s hull and internal systems. X-8’s crew transferred from their submersible back to HMS Sea Nymph scuttled at sea on 18 September 1943. Sea Nymph returned home to Scotland without any further incidents.
On September 20, the remaining four X-craft slipped their tows and embarked on their attack routes. X-10 soon experienced mechanical problems. Not wanting to risk compromising the mission, the X-10’s commander aborted and returned to the rendezvous site. As it turned out, the Scharnhorst had left its anchorage so the mission would have failed in any event. Thus, only the Tirpitz would be attacked.
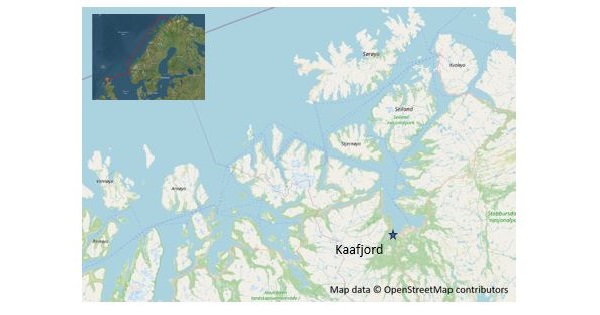
Map of Kaafjord Norway, location of X-craft attack on German Battleship Tirpitz (map derived from OpenStreetMap). View location on Google Maps.
Insertion
X-6
Just after dawn on the 22nd, LT Donald Cameron maneuvered X-6 into the wake of a German coaster as it transited through the open outer torpedo net. With a flooding periscope and malfunctioning gyroscope, X-6 ran aground on rocks and was spotted by alert German sentries when she was forced to surface by the damage she sustained after hitting the rocks. Gunners aboard Tirpitz opened fire on X-6. LT Cameron blindly dove his damaged craft and made his way beneath the massive Tirpitz. His crew successfully armed and released the two 2-ton charges beneath “B” turret on Tirpitz about one third of the way behind the bow, and the X-6 moved back out into the fjord. Realizing that escape was impossible from inside the two concentric rings of the torpedo nets, LT Cameron surfaced X-6 and surrendered to Germans aboard a gunboat. The Germans transferred the captured X-craft crew to the Tirpitz for detention and interrogation. The exhausted crew saluted the German officers as they boarded the battleship and were treated to coffee and schnapps, fully aware of the countdown on the times fuse burning on the sea floor beneath them.
X-7
X-7, commanded by LCDR Geoffrey Place, encountered a returning German coaster as she approached the boom, maneuvered into her wake, and followed her through the open boom. As she closed the distance with Tirpitz, X-7 became entangled in the anti-torpedo nets, locked out her diver and managed to cut her way through. X-7 armed and placed her charges beneath the bridge and “C” turret, and then turned to make her escape.
X-5
X5, commanded by Lieutenant Henty-Creer, disappeared with her crew during the operation. She was last seen right after the three remaining X-craft cleared the minefield protecting Soroy. Neither the submersible nor any of her crew of four were ever found.
At 0812, the British charges detonated, with X-6’s crew onboard the German warship and X-7 stuck in anti-torpedo nets a few hundred yards away. The stricken Tirpitz listed to port with a large hole in her side. Smoke flooded the crippled ship along with steam from pipes severed in the blast.
Movement to Extraction
X-7 finally freed herself but had to transit on the surface to fly over the nets. Under fire and badly damaged, X-7 sank before the crew could surrender. OIC LCDR Place was able to escape before the hull slipped beneath the waves. The other three members of his crew were trapped inside and were lost with the sinking craft.
Outcome
In September 1943, at least two X-craft from the Operation SOURCE task force severely damaged and rendered temporarily inoperable the German battleship Tirpitz to the point where she could no longer threaten convoys in the North Sea.
British casualties were as follows:
- 9 X-craft crew killed in action
- 6 X-craft lost
British captured by the Germans were as follows:
- 6 X-craft crew POW
Only 27 men from the original assault force returned as planned. Nine X-craft crewmen returned from inside Altenfjord.
Significance and Lessons Learned
Operation SOURCE was the second attempt to use submersibles to attack the stationary Tirpitz. The mission was of strategic—vice tactical importance. This mission highlights the desperation among British political leadership and the Admiralty during some of the darkest days of World War II.
The Tirpitz was mortally wounded during Operation SOURCE, and the coup de grâce would come from the air in the form of 12,000 lb. “Tall Boy” bombs dropped by British Lancaster bombers during Operation CATECHISM, eliminating the threat to vital supply lines across the North Atlantic. Countless lives were saved aboard those ships which might have been sunk by Tirpitz. Preceded only by the CSS Hunley attack on the USS Housatonic in 1864 and the pre-invasion activity on D-Day, this raid was one of the first uses of a dry submersible in a combat role.
**********
Reference Books
Botting, Douglas. World War II: The Second Front. London: Time-Life Books, 1978.
Miller, Russell. The Commandos. Chicago: Time-Life Books, 1981.
The Reader’s Digest Illustrated History of World War II. London: Reader’s Digest Association, 1989.
Young, Peter. Commando. New York: Ballantine Books, 1969.
Reference Online Sources
Crane, Rob. “X-Craft Midget Submarines.” COPP Survey. Last updated February 19, 2026. Accessed August 11, 2026.
Grove, Eric. “Lost Heroes of the ‘Tirpitz.’” BBC History. Last updated February 17, 2011. Accessed August 11, 2026.
Kimenai, Peter. “Operation Source: British Midget Submarines Against a German Battleship.” TracesOfWar.com. Published June 23, 2019; last updated September 30, 2024. Accessed August 11, 2026.
Mason, Bill [username “emason”]. “Operation ‘Source’—The X-Craft Attack on the Tirpitz.” Lewin of Greenwich Naval History & Forum. December 16, 2020. Accessed August 11, 2026.
“Varley Marine (Hamble).” Barrow Submariners Association. Accessed August 11, 2026.
About the Author: Commander (USN, retired) Shaun A. Chittick graduated from Basic Underwater Demolition/SEAL training in November 1985, and rose through the ranks to senior chief (E-8) during assignments to SEAL Team FOUR and the Naval Special Warfare Development Group (NSWDG). He was commissioned as a SEAL Officer in 2000 and completed assignments at SDV Team ONE, SDV Team TWO, NSWDG, Naval Special Warfare Group Four (NSWG-4), and retired out of SDV Team TWO in January 2021 after over thirty-six years of service. He currently works as a government employee for Naval Undersea Warfare Center Keyport.