
By Shaun Chittick.
Background
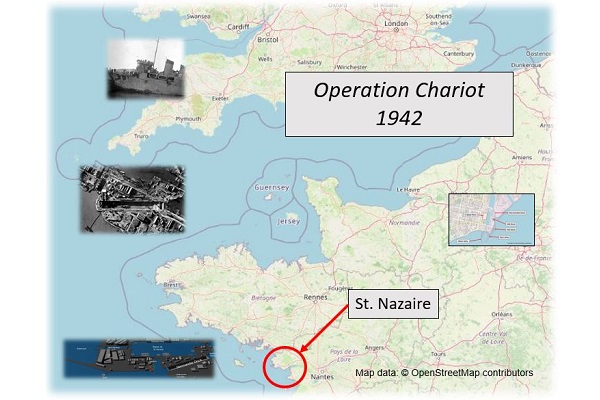
This essay provides an account of the British raid on the port of Saint Nazaire, France toward the end of March 1942. The intent of the raid was to render the dry docks at Saint Nazaire inoperable and deny the German navy the only safehaven capable of repairing a damaged Tirpitz. Once Bismarck was destroyed and sunk at great cost to Britain, Tirpitz remained the primary surface threat to Allied shipping across the North Atlantic that provided a vital lifeline to Britain and the European Theater during World War II.
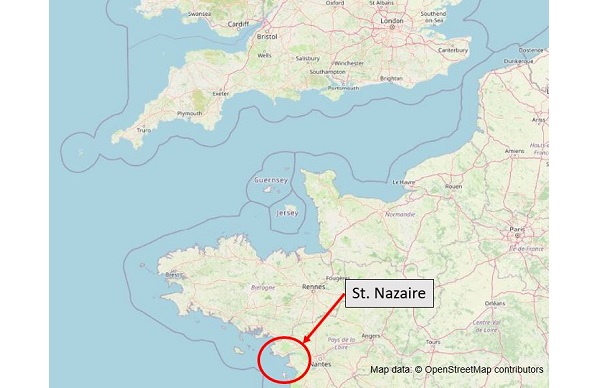
Four unsuccessful attempts had been made to bomb and sink Tirpitz, with the loss of 12 aircraft. The British Admiralty decided that the Forme Ecluse (the dry dock at St. Nazaire) must be disabled, to deny the Tirpitz safehaven. St. Nazaire was located 250 miles from Falmouth, England, the nearest British port. The dry dock was located 6 miles inland from the mouth of the Loire River, on the north bank. There were no beaches for landing troops.
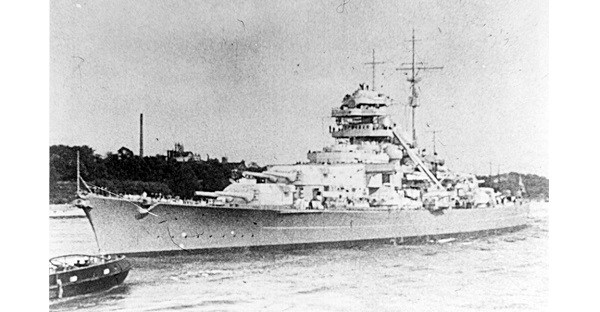
Photo: Tirpitz underway for trials, circa September 1940 (Wikipedia, U.S. Naval Historical Center)
The Battle of the Atlantic
Where General Weygand saw nothing of military value the Germans saw a strategic treasure. The entire Breton peninsula was incorporated into the zone of occupation. The harbors and dockyards of Brittany became the main base for German attacks on the convoys ferrying supplies between North America and Britain. The first U-boat began operating from Brest on 22 August 1940.
A month later, Admiral Karl Donitz began directing operations from headquarters at Lorient. The wolfpacks were transferred from bases at Kiel and Danzig on the Baltic to captured French ones on the Atlantic at Brest, Lorient and Saint Nazaire. The distance to their feeding grounds was shortened by nearly 500 miles and operational periods increased accordingly. The arsenals of Brest and Lorient no longer launched ships named Clemenceau, Dunkerque and Bretagne. Now they serviced vessels called Scharnhorst, Gneisenau and Prinz Eugen. The home of the world’s largest submarine, Surcouf, was now occupied by boats whose only identification was the letter U followed by a number.
The Royal Air Force began to counterattack with a 27 September 1940 raid on Lorient followed by others on Brest and Saint Nazaire in January 1941. The initial air raids caused little damage but the Germans became aware of their vulnerability in the exposed harbors. They began rectifying the situation immediately. Reinforced concrete shelters called Dombunkers and Keromans covering tens of thousands of square meters were constructed over the next two years. The Saint Nazaire bunkers were the largest with pens for 14 submarines. The RAF flew 30 missions against them during March 1942. Bombers scored direct hits 18 times but they caused minimal damage and failed to penetrate the six meters of concrete shielding the submarines. Sixty-two aircraft were lost in the attempt. The collateral damage to the adjacent town was more severe. Eighty percent of Saint Nazaire was reduced to rubble by the end of the war.
Brest was the target of eighty British and American air raids. The last three, conducted during the August 1944 siege were the most successful. The RAF scored nine direct hits on the Brest shelter with some of the largest bombs in their arsenal, 12,000-pound Tallboys, five of them penetrated the shelter’s roof but caused little damage to the submarines. The Royal Navy fared somewhat better against the Germans’ surface operations. The Scharnhorst, Gneisenau and Prinz Eugen had a close call while returning to the North Sea following an overhaul at Brest in March 1942. Two of the ships were damaged by mines and nearly sank while the task force was taking a shortcut through the English Channel.
Mission Tasking
On January 25, 1942, Sir Winston Churchill noted in a memo, “The whole strategy of the war turns at this period on this ship [Tirpitz], which is holding four times the number of British capital ships paralyzed, not to speak of two new American battleships retained in the Atlantic”.
The mission was to drive the HMS Campbeltown, with her bow packed full of explosives, into the massive gates of the dry dock, and conduct supporting attacks on gun emplacements, pump and other related machinery.
The date was set for the end of March, on the last full moon and high tide of the month.
Port St. Nazaire was defended by some 100 guns of various sizes, along with giant searchlights. The dock area was frequented by minesweepers and coast defense vessels. The port contained two large artificial anchorages generally used by small German warships. The city itself was home to 5,000 or more German soldiers and sailors, including a whole infantry brigade.
The dry dock, was enormous, composed of a manmade basin 1,148 long by 164 feet wide. The dry dock was opened and closed by monstrous 35-foot-thick gates, called “caissons”—each 167 by 54 feet square, and designed to move on huge rollers. The winch houses that powered the gates, and the pumping stations that flooded and drained the dock were constructed on the same scale as the great dock itself.
Operational Prep of the Environment
The British Royal Air Force (RAF) conducted regular aerial reconnaissance. Allied intelligence agents created drawings and a terrain model of both the port and the submarine pens. The dry dock itself was virtually identical to the King George V dry dock at Southampton, England. Aerial photos showed four newly installed coastal gun positions.
The Loire estuary consisted largely of shallows and mud flats. There was a single, deep dredged main ship channel, to the north of the estuary. On a spring tide, shallow draft vessels could operate across the shallows and around the mud flats, outside the main ship channel.
The estuary was a natural choke point and heavily defended by German coastal artillery. Fortified guns on the northern shore included 4 x 150 mm howitzers, 4 x 170 mm guns and 4 x 75 mm guns at Chémoulin, south-west of St. Nazaire; 4 x 88 mm guns and 10 x 20 mm or 40 mm guns at Villès Martin closer to St. Nazaire; farther away at La Baule were 4 x 105 mm guns and 2 x 240 mm railway guns. Across the estuary from St. Nazaire were 4 x 75 mm guns at St Gilda, another 4 at Le Pointeau and 10+ 20 mm guns at Mindin. In the immediate harbor area were around 30 x single 20 mm guns, 2 x quad 20 mm guns, around 15 x 40 mm guns and a flak ship, the Sperrbrecher 137, just off the new port. Heavy anti-aircraft defenses were also situated within the town. Radar stations were operating at Le Croisic and at St Marc, all the German positions also had searchlights. Around 1,000 troops manned these defenses and there were a further 5,000 or so military personnel in the town.
Mission Planning and Training
British Royal (RN) Navy Captain John Hughes-Hallett developed the assault plan. RN Captain Robert (Red) Ryder was designated the task force commander. During planning, a senior naval officer had warned Lord Mountbatten, “We may lose every man”. Mountbatten agreed, and added, “If they do the job, we’ve got to accept that.” Mountbatten felt that by denying St. Nazaire’s repair facilities to the Tirpitz, the commandos could alter the course of the naval war in the Atlantic.
The Ground Assault force and security element would be composed of 100 select men from Number 2 Commando, commanded by LTC A. C. Newman, augmented by demolition parties from Numbers 1, 3, 4, 5, 9, and 12 Commando, trained and led by CPT W. H. Pritchard. Detailed planning began in February 1942, under conditions of great secrecy. The assault force was given two months’ time to plan, prepare and rehearse. Demolition parties were assembled under the pretense of receiving a “course of instruction”. Number 2 Commando received training in night firing, route and obstacle negotiation, and even a shakedown cruise.
HMS Campbeltown was a former US destroyer which would be loaded with demolitions and lead the assault force across the English Channel and south along the coast of France. The ship would rendezvous with RN submarine HMS Sturgeon, navigate the seaward six miles of the Loire River, smash into the south caisson, and debark the ground assault force in the initial phases of the assault. An elaborate deception plan was integrated to buy time for the raiding force. HMS Campbeltown’s smokestacks were cut down to resemble a German “Mowe” class destroyer. ¼” armored plate was added around the bridge and amidships. Also, Campbeltown would flash the German code for “friendly ship approaching” once it was detected by the German defense network.
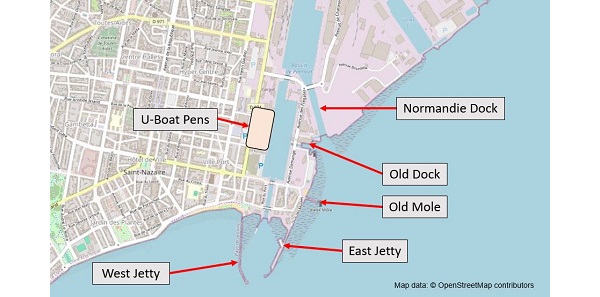
Following the assault, the ground assault force would fight their way to the Old Mole in the port, to be extracted by motor launch (MLs). The task force, minus the sacrificed Campbeltown, would withdraw down the Loire River, out to sea and back to their staging point in England. The raiding force conducted a full-dress rehearsal at the Devonport Dockyard, which did not go well at all.
Order of Battle
- RN destroyers Atherstone and Tynedale.
- HMS Campbeltown (formerly the USS Buchanan).
- Motor Gun Boat 314.
- 16 x Motor Launches.
- 1 x Motor Torpedo Boat
- 75 x Number 2 Commando
- 268 x assorted commandos organized as assorted demolition parties.
- 353 x RN officers and men.
- 621 men total
The Transit
The task force departed Falmouth on 26 March 1942. The weather was rough at the outset, but the wind gradually died, and the night was calm, hazy, and moonlit. They spotted a German U-boat on the 2nd day and attacked it with depth charges. The decision was made to continue mission.
At 2000, the assault force hove to, and transferred the headquarters element to MGB 314. 75 commandos were staged aboard Campbeltown poised to conduct the assault once the ship was stuck fast in the west caisson of the dry dock. The destroyers Atherstone and Tynedale picketed 1 mile apart to locate HMS Sturgeon, 40 miles SW of St. Nazaire. HMS Sturgeon would guide the assault force to the mouth of the Loire River. At 2200, the assault force began its final run toward the objective, with MGB 314 leading, Campbeltown following just behind, and the other 17 boats in trail.
Insertion
RAF bombers attacked St. Nazaire through low cloud cover, as a diversion.
At 0122, German sentries switched on searchlights and challenged the raiding force.
MGB 314 flashed “Ship being fired upon by friendly forces” in German code. German shore batteries ceased fire for a golden five minutes.
At 0127, Campbeltown, now past the heaviest shore batteries, was engaged by fire. The convoy returned fire, and suppressed shore fire in 3-4 minutes.
Seven minutes later, Campbeltown crashed into dry dock gate at a remarkable 19 knots. At the time, 75% of the commandos aboard Campbeltown were already wounded by German fire. The demolition parties debarked via iron ladders and commenced the ground assault.
Other commando teams set up blocking forces to prevent reinforcement from the nearby town.
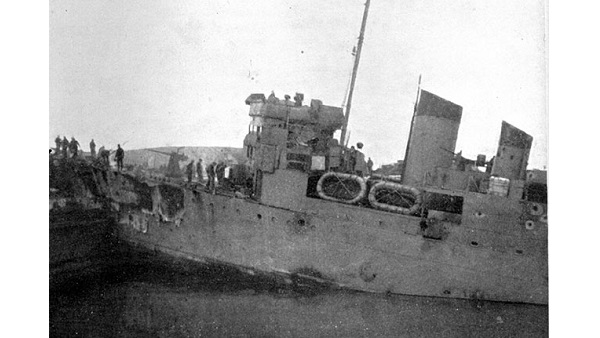
Photo: HMS Campbeltown wedged in the dock gates. German photo taken before the explosion. (Bundesarchiv, Bild 101II-MW-3722-03 / Kramer / CC-BY-SA 3.0)
Attack on the Pump House
LT Stuart Chant and SGT Chamberlain, both wounded in the legs while Campbeltown was making her run disembarked with their raiding party and made their way to the Pump House. The pumps were forty feet below the surface. Each team member carried 60 lbs. of explosives. The team found the layout to be identical to the King George V dry dock where the commandos rehearsed. They quickly destroyed all four impeller pumps and the electric motors that powered them.
LT Roy and his raiding party disembarked Campbeltown on the port side and made their way to the guns on top of the Pump House. They found the guns abandoned, blew them in place and made their way to the secondary objective—the Old Entrance Bridge.
Attack on the North Winding House
LT Etches and his raiding party were to attack the North Caisson and Winding House. Etches was wounded in the legs and left behind. LT’s Purdon, Brett and Burtenshaw led the two demolition parties.
LT Denison and his two men set security against an approach across the Northern Swing Bridge.
The men were unable to gain access into the North Caisson, but suspended charges over the side, all while under heavy fire. Burtenshaw and six others were killed in the assault. The caisson was flooded when the charges went off, and the remaining raiders fought their way to the rendezvous at the Old Mole.
Attack on the South Winding House
LT Smalley and his raiding party disembarked Campbeltown and made their way to the South Winding House, 50 yds. West of the dry dock. They destroyed the Winding Shed, then signaled ML 262 for immediate exfil. Smalley was later killed aboard ML 262 as they pulled away.
Attack on the Underground Fuel Tanks
LT Roderick and his raiding party disembarked Campbeltown on the starboard side and attacked the three gun positions between the dry dock and the Loire. They then attempted to set fire to the underground fuel tanks. After failing to do so, they fought their way to the RV with the command element.
Establishing a Command Post
LT Roy and his raiding party secured the Old Entrance Swing Bridge without a fight. LT Woodcock was supposed to blow the bridge once all commando teams made it across to the southwest.
Only four out of twelve ML’s were able to land commandos as planned. Command Element (CDR Ryder and LTC Newman) maneuvered to land with the MGB. Ryder inspected Campbeltown and withdrew to sea. Newman remained and took charge of the assault from his Command Post by the Old Entrance Swing Bridge.
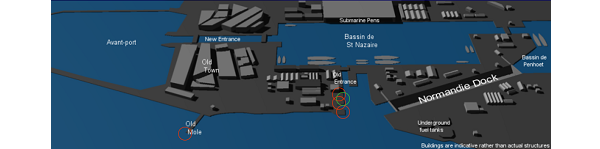
Graphic of the harbor of St. Nazaire circa 1942 (Wikipedia 2007, view larger image)
Movement to Extraction
The commandos fought their way to the LTC Newman’s command post near the Old Entrance Swing Bridge. Word arrived that most of the motor launches were destroyed, and many saw their rides home burning on the water. German gunfire sank or ignited the fuel on two thirds of the ML’s, inadvertently ruining the raiders’ chance of getting home.
Breakout
LTC Newman realized the situation had become grim. The Old Mole was never captured, and there was now no chance for waterborne evacuation. Over 75% of his force was wounded. Newman asked his second-in-command, “Shall we call it a day?”
MAJ Copland replied, “We’ll fight our way out!”
The survivors were split into groups of twenty men each. LTC Newman ordered each to fight its way out of the dockyard, through the town, and on into Spain and Gibraltar.
Turn of Events
At 0250, Capt. Ryder gave the order to withdraw. The commandos, with nowhere to go, fought their way into the town of St. Nazaire. Dawn broke with the HMS Campbeltown stuck fast in the dry dock gate.
Some 40 German officers and 400 troops were dockside, when the Campbeltown’s charges finally blew at 1055. In the panic following the massive explosion, the Germans shot and killed 16 French dockworkers and wounded 30 others.
Outcome
Dry dock gates rendered inoperable by explosion from HMS Campbeltown. Pump house machinery was destroyed. The winding stations were also destroyed. Five Victoria Crosses were awarded for the participants of the raid. The Tirpitz was sunk two years later by British bombers.
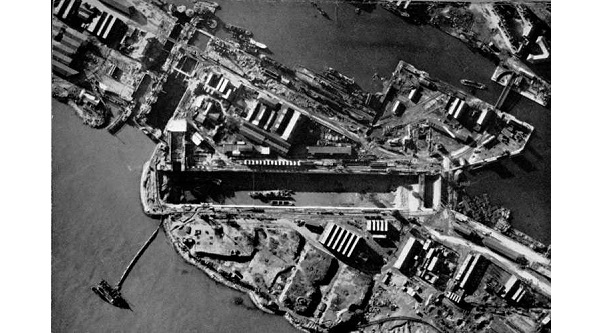
Photo: Dry dock at St. Nazaire after Operation Chariot in 1942 (photo Imperial War Museum)
British casualties were as follows:
- 105 British Navy Officers and ratings
- 64 Commandos
- Total: 169 men killed
British captured by the Germans were as follows:
- 106 Navy personnel
- 153 Commandos were also captured
- Total: 259 captured
Only 208 men from the original raiding force returned as planned
Significance and Lessons Learned
Operation Chariot was an early and exceptionally complex British joint special operation of World War II. The mission was of strategic—vice tactical importance. The mission planners and raiders demonstrated out of the box thinking, and were dynamic in execution, even as the plan unraveled and their means of seaborne extraction was destroyed.
The Tirpitz never left the Norwegian fjords to threaten the vital supply line across the North Atlantic. Countless lives were saved aboard those ships which might have been sunk by Tirpitz. This raid was a bold example by the British that went on to spur the morale of the French Resistance.
**********
References
Young, Peter, Commando, Ballantine Books, Inc., New York, NY. 1969.
___, The Reader’s Digest Illustrated History of World War II, Reader’s Digest Association, Ltd., Berkeley Sq., London. 1989.
Miller, Russell, The Commandos, Time-Life Books, Chicago, IL. 1981.
Botting, Douglas, World War II, The Second Front, Time-Life Books, Berkeley Sq., London. 1978
McRaven, William H., Spec Ops: Case Studies in Special Operations Warfare Theory and Practice, Presidio Press, Novato, CA. 1995.
Lewis, Jon E., Carroll & Graf, True Stories of the Elite Force. New York: Carroll & Graf, 1993.
Ford, Ken, St Nazaire 1942: The Great Commando Raid, Osprey Publishing, Elms Ct., Chapel Way, Botley, Oxford OX2 9LP, UK
Mason, David, Raid on St. Nazaire, Hazell Watson & Viney Ltd., Aylesbury, Bucks. 1970.
About the Author: Commander (USN, retired) Shaun A. Chittick graduated from Basic Underwater Demolition/SEAL training in November 1985, and rose through the ranks to senior chief (E-8) during assignments to SEAL Team FOUR and the Naval Special Warfare Development Group (NSWDG). He was commissioned as a SEAL Officer in 2000 and completed assignments at SDV Team ONE, SDV Team TWO, NSWDG, Naval Special Warfare Group Four (NSWG-4), and retired out of SDV Team TWO in January 2021 after over thirty-six years of service. He currently works as a government employee for Naval Undersea Warfare Center Keyport.